
Tile Customization Guide
This guide summarizes my learnings from customizing my hand-shuffled tiles for chroma-jong with my friend Miles. Huge thanks to Miles, whose crafting experience carried us through the physical process. Shout-out also to CY, Erik K., and Allen Z. for sharing their advice and experience customizing their own tiles – you will see me referencing them in ths guide.
This guide covers tile re-coloring and drilling holes to create pocchi tiles. Whether re-coloring or drilling holes, one should experiment with some disposable tiles first. We tried a few things on the rarely used season tiles, as recommended by Erik in his guide.
As a bonus, I will also share some notes on importing professionally customized tiles from Japan.
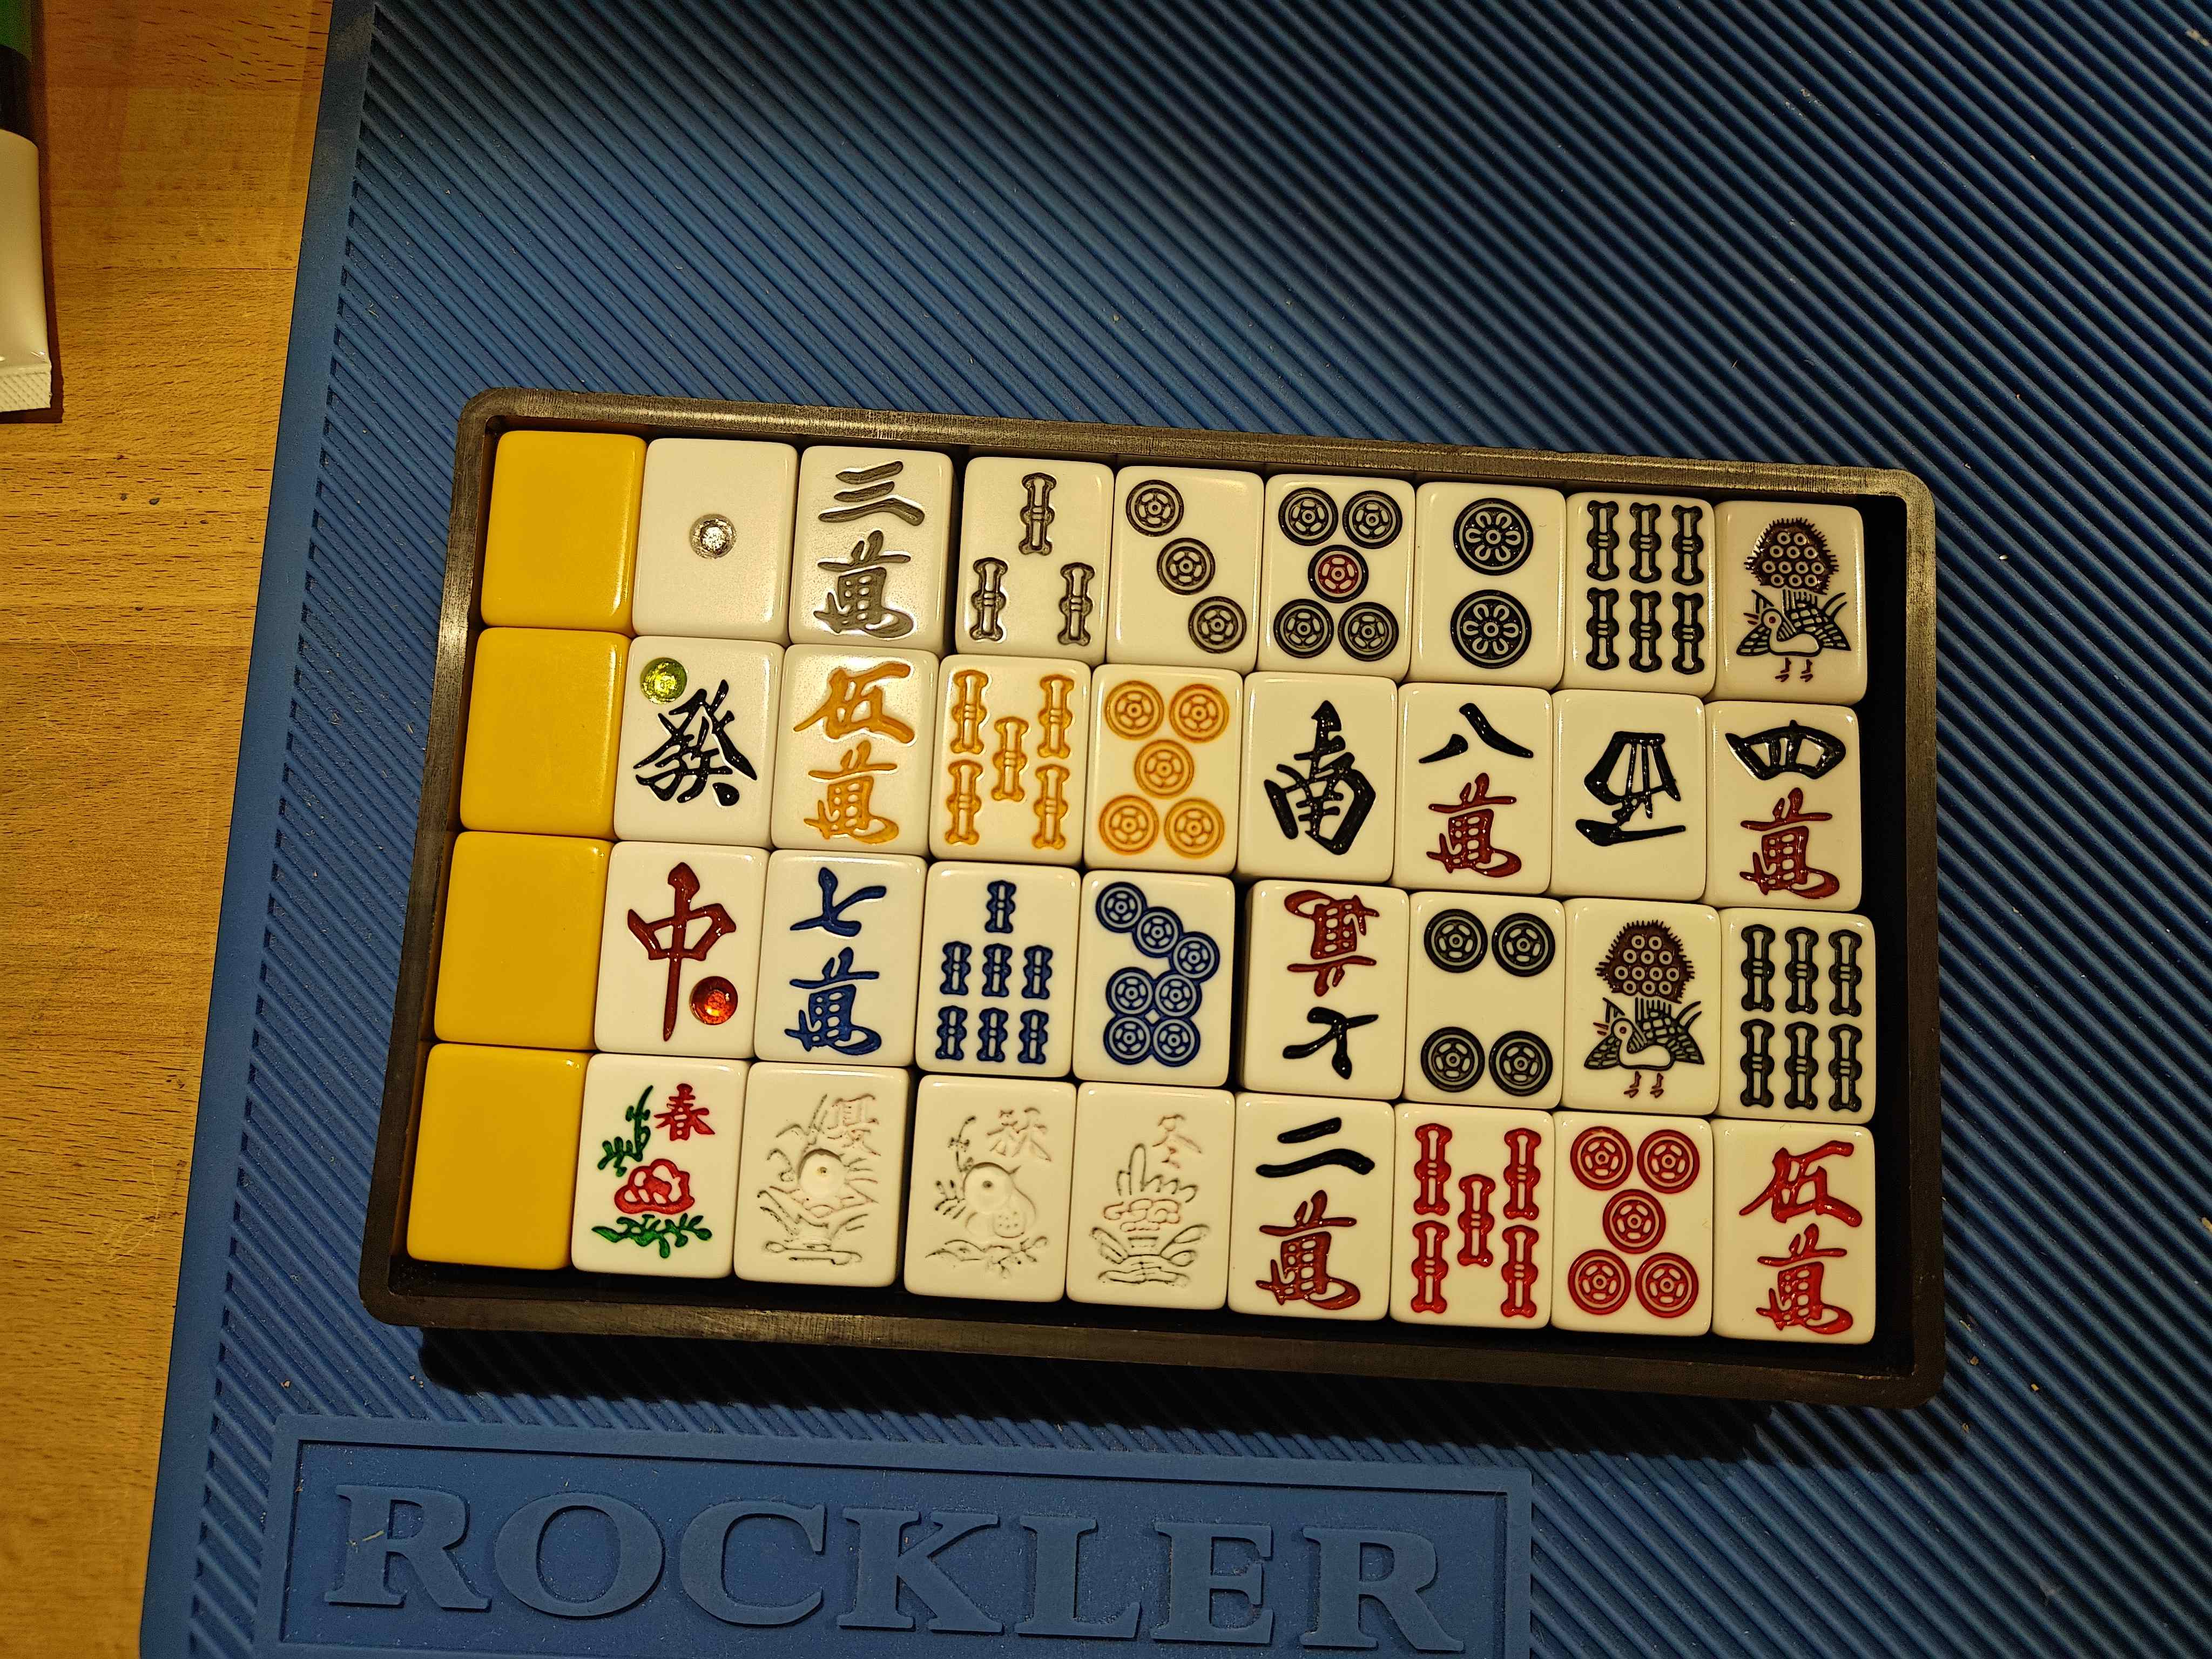
This is the result of ~7 hours of work by me and Miles, including our trial and error. We think the customized tiles look pretty nice at a distance, although we do want to add one more layer of paint to the number tiles.
Re-coloring
Tools Used
- Soy gel paint remover
- Paint brushes with fine tips
- besides painting, you can use these to apply soy gel
- Toothbrush
- X-acto Knife
- Sewing needle
- Isopropyl Alcohol (91%)
- Paper Towel
- Acrylic paint (this is the one we used)
Paint Removal
To re-color a tile, one needs to remove the original paint first, to ensure that the engravings have space for the new paint and that the new paint sticks. If you are lucky, you could get an unpainted set and skip this step entirely (Ichikawaya used to sell those)
Of course, different tile sets use different materials for the tiles and for the paint. Picking the right paint remover with respect to your tile set is essential because the wrong paint remover can be ineffective in removing paint and/or damage your tiles.
For this post, I will talk about my experience customizing the Amos Prime Gear tile set. The tiles in that set are made from urea resin, but I don’t know what the paint material is. Most Amos hand-shuffled tiles are made from urea resin.
Paint Remover Candidates
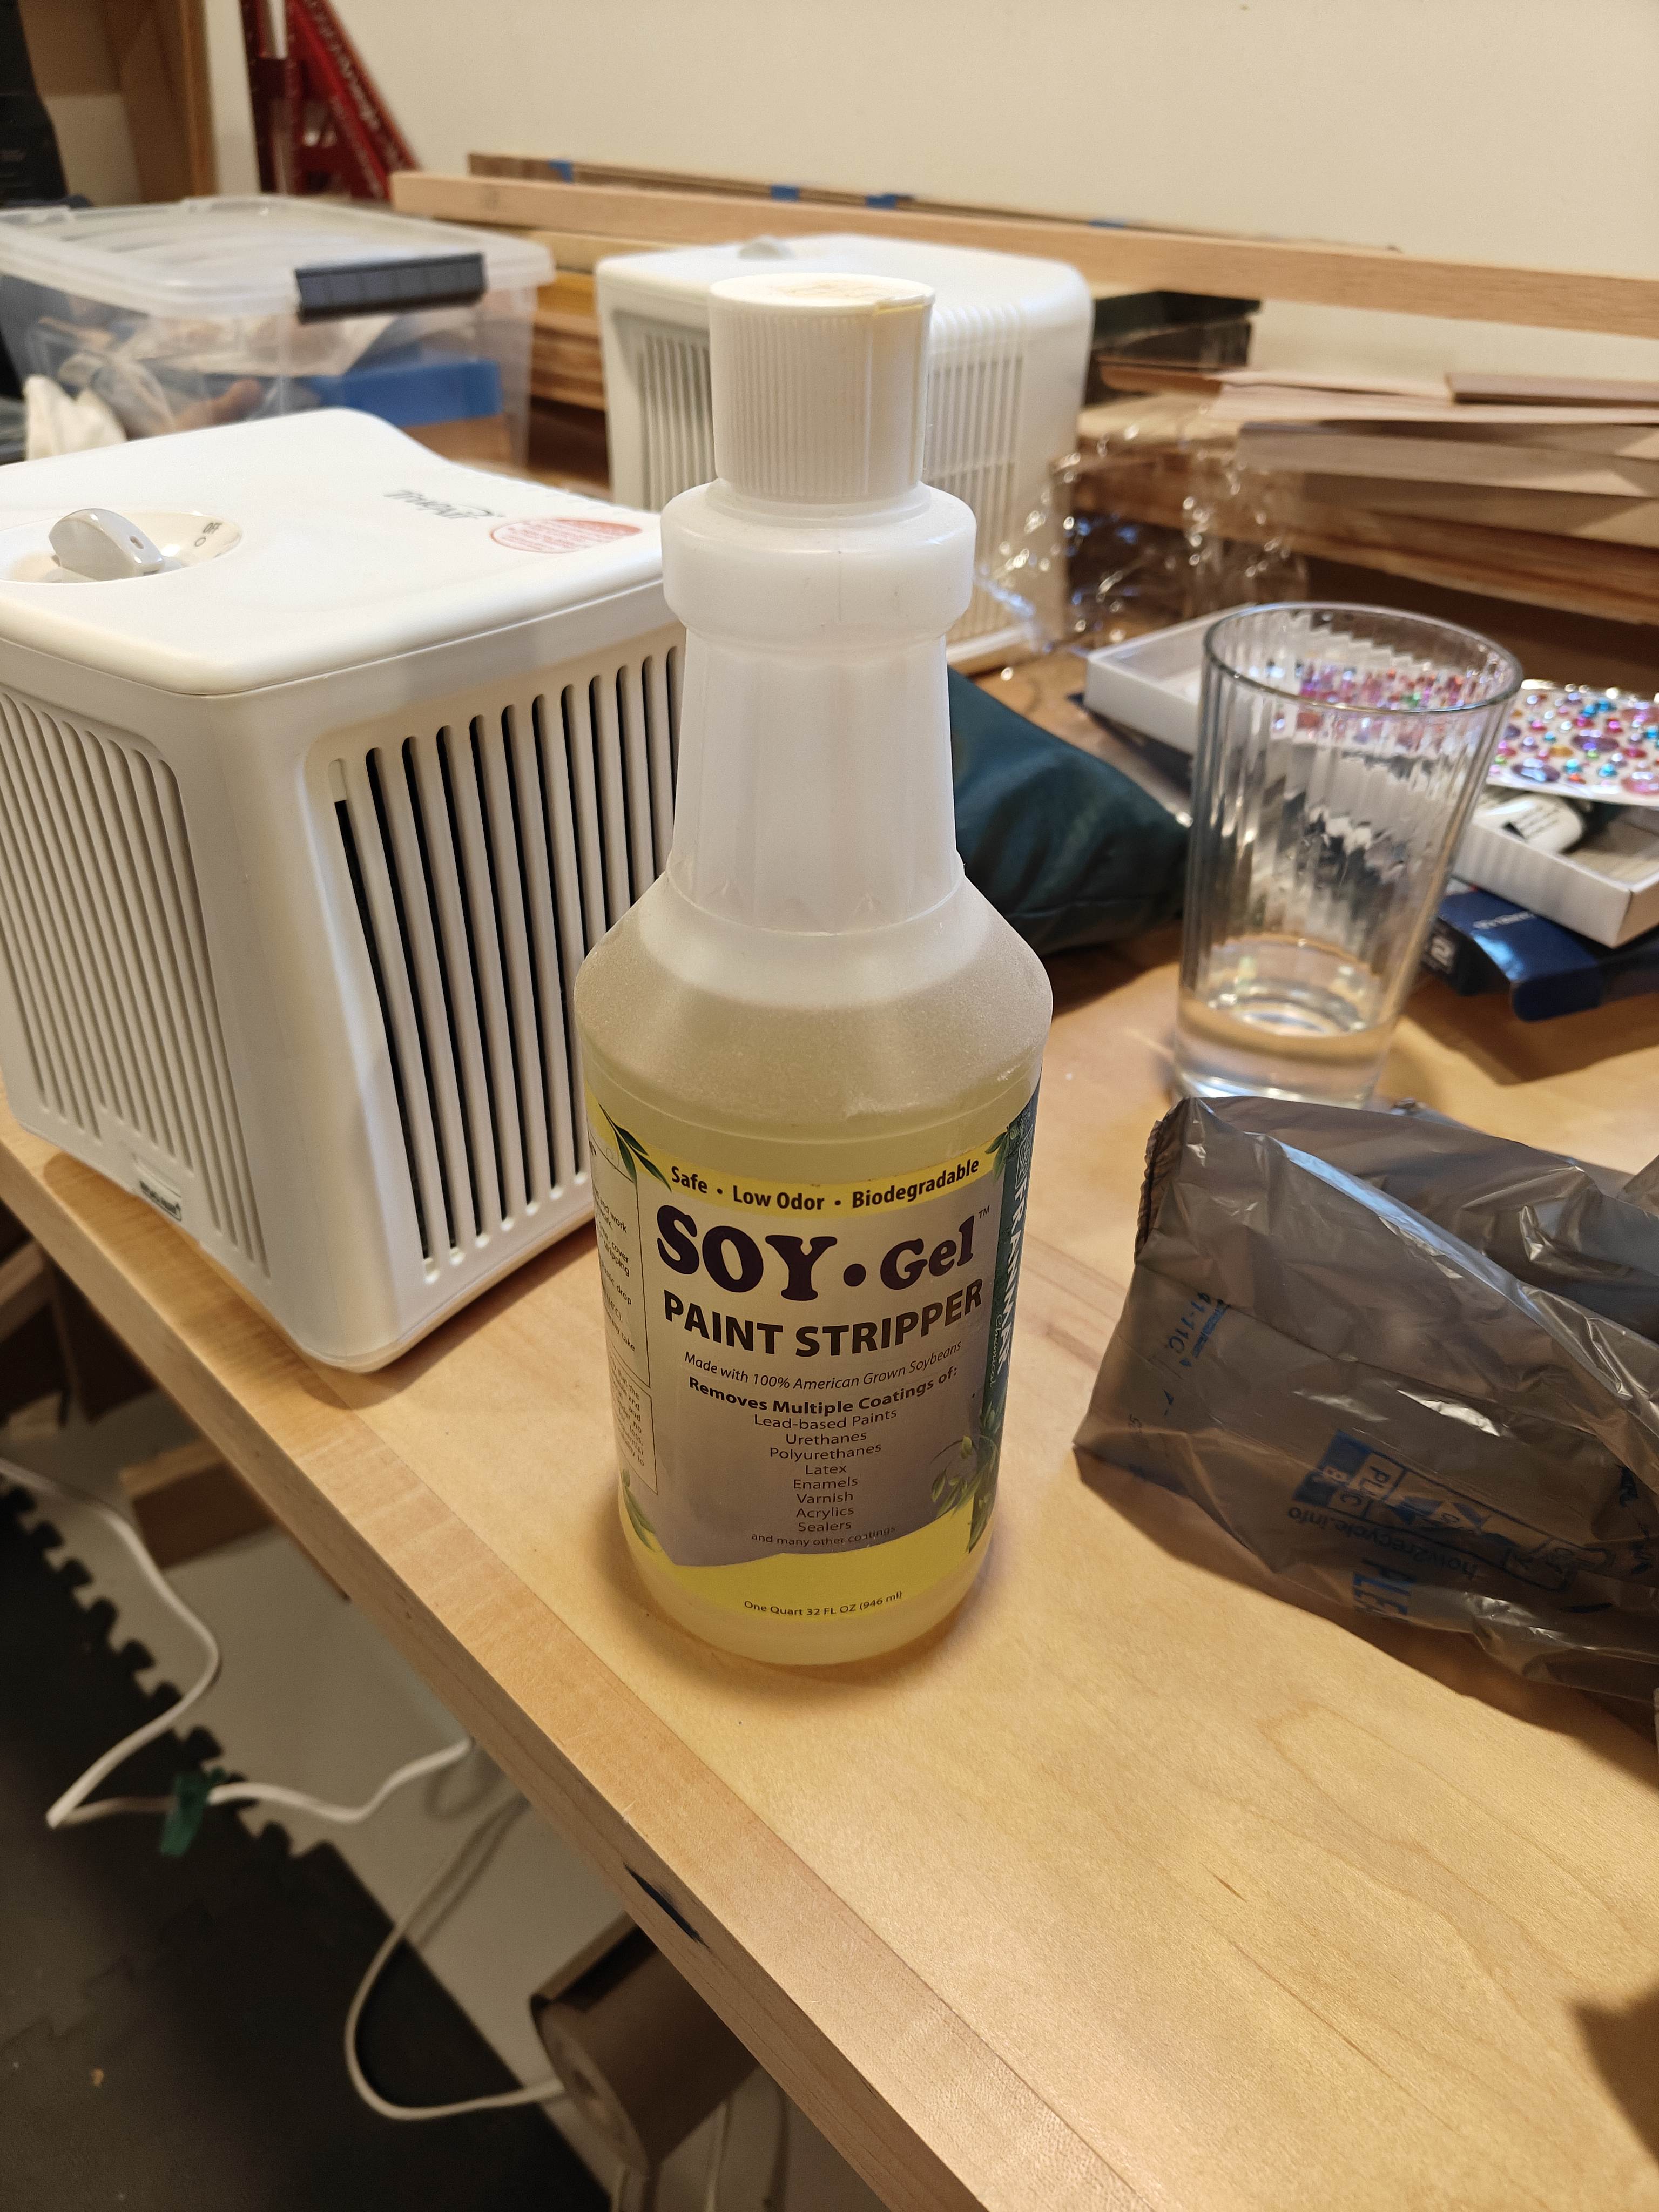
- Soy gel is what we ended up using throughout the process. It was fast-acting (compared with IPA) and did not appear to damage the tiles.
- This Tamiya brand Paint Remover is likely the most suitable. It’s the only paint removers I identified that explicitly advertises safety against resins, but I could not obtain it.
- There are a lot of recommendations for using isopropyl alcohol (IPA) as it is relatively safe against resin. On the other hand, it is also known to be relatively slow. We did try using 91% IPA and it was indeed quite ineffective when compared with soy gel.
- Allen used 70% IPA for his project and found that it was very weak. This is why we tried 91% IPA instead.
- Acetone is likely too strong for typical tiles.
- Hard (but safe) mode: no paint remover at all – just use the knives and needles to scrape away the paint directly. Erik and CY have taken this approach before. This is easier for tiles with shallow engravings (Amos tiles generally have deeper engravings).
By the way, this is what a tile looks like after I soaked it in 91% IPA for 20 minutes and then scored it for a solid 10 minutes. As you can tell, not much came off. The result of soaking another tile in 91% IPA for 40 minutes was similar. We gave up on 91% IPA after that, as we found Soy Gel to be effective after just 20 minutes.

This is the soy gel we used (it’s 10+ years old; new ones may be more effective?):
Removing the Paint
The process we used for the 9 number tiles are as follows:
- apply soy gel to the tile face and let sit for 20+ minutes. You can go to the next step after you notice paint rising and turning into something… indescribably unsettling. The first picture below for the 冬 season tile is what the tile looks like after only 20 minutes in soy gel, but you likely want to wait longer. The second picture shows


 after sitting in soy gel for longer.


- Optional: score the paint a bit with an X-Acto knife prior to applying soy gel so the gel sinks in better. We tried this but couldn’t see noticeable difference compared with when we did not score the paint beforehand.
- Under running water, scrub the tile face with a toothbrush. This will remove most risen paint.

- Use an X-Acto knife to scrape some remaining paint out. Use a sewing needle for narrow spaces.
- Don’t expect to be able to remove all the paint in 1 pass. Literally, rinse and repeat. Most times, 3 passes are sufficient. For example, in the image below,
 has gone through 2 passes, while other tiles have only gone through 1 pass.

Note that we did not try applying the soy gel for longer than 1 hour. We don’t know if longer exposure would damage the tiles or make removal easier.
Painting the De-colored Tiles
- you’ll need to apply multiple layers of paint on each tile.
- as you apply paint, you want to wipe off the excess on the paper towel regularly (usually 2-3 times during each layer application).
- you can use IPA-dipped paper towel to remove semi-dried excess/smears on the tile face
- for tiles with shallow engravings, it may be difficult to wipe off the excess without taking good paint away in the process (CY experienced this difficulty with his black Chinese set from Yellow Mountain Import)
- after applying each layer, let it dry before applying the next. Otherwise, you risk disturbing the settling paint and creating a fuzzy/crumbly mess… speaking from my unfortunate experience)
Drilling Holes to Create Pocchi Tiles
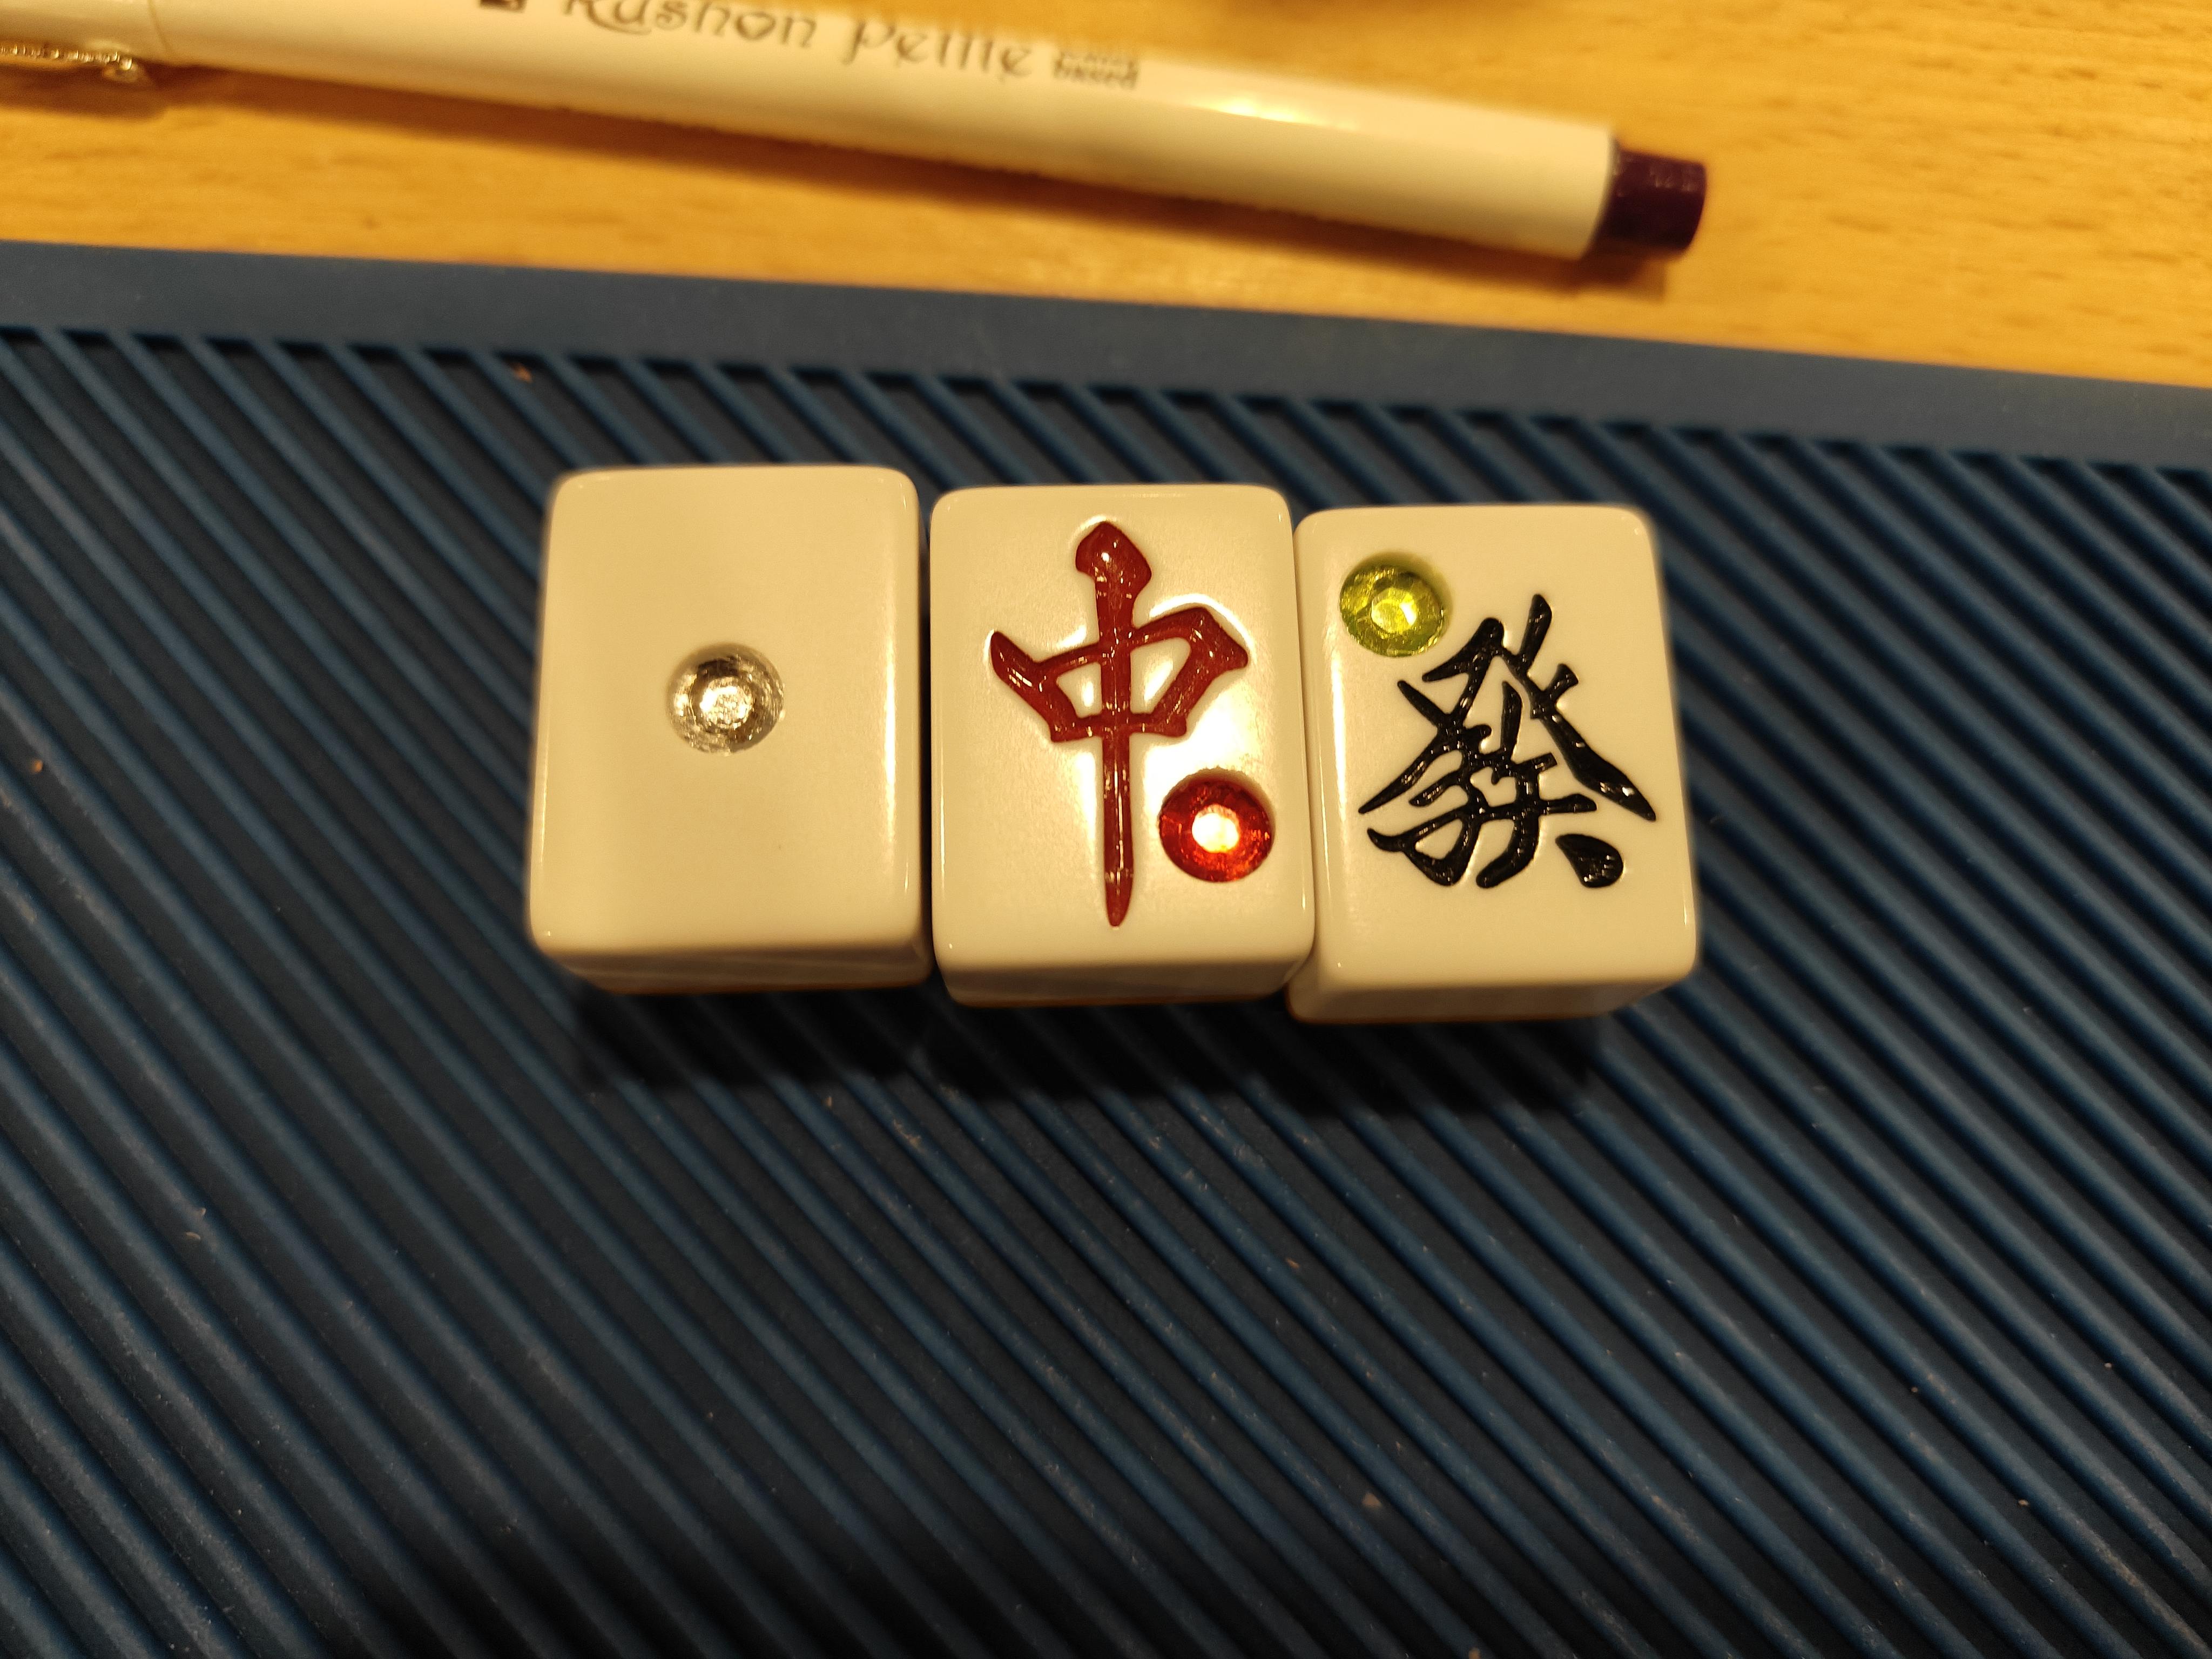
Miles is the MVP for this process. Here, Miles measured the tiles’ dimensions and operated a drill press to create the holes for the pocchi tiles: prismatic  , fern-green
  , and light-siam
  .
.
Findings
- we are not sure if this is due to wear or heat warping, but my tiles are not strictly cuboids – they are closer to being either flat pyramids or bevels, where the tile back is slightly bigger than the tile face.
- as a result, we needed to be careful about measuring where the tile face center is, because it may not be aligned with the center of the tile back (when the tile is bevel-shaped)
- Erik noted that hand-shuffled tiles tend to have more (noticeable) inconsistencies than auto-table tiles.
- Miles recreated the size of a tile face on a wood plank and used that for practice (for determining the position and depth). Again, we needed to be aware of the non-cuboid nature of the tiles.
- the “gems” we used are just cheap rhinestones with an adhesive flat back.
- We dissolved the original cheap adhesive in IPA before applying our own glue in the drilled hole.
- because my tiles don’t have metal cores (unlike auto-table tiles), we weren’t afraid of using drill bits with brad point all the way (you can see the results on my 夏 and 秋 season tiles in the top picture).
Alternative to Drill Press: Dremel
I want to share Erik’s tips on using Dremel to create the pocchi tiles – Dremel is likely more accessible than a full drill press.
I use a masonry bit to carve out a beveled edge for the hole. Then I use a normal drillbit to carve the recess for the fem, making sure that it lays slightly below the surface of the tile. To mount the gem, use a glue like E6000 that dries clear but has a good hold. It is particularly good because the excess can be cleaned off like rubber if it leaks from under the gem.
In general you are going to want to start slow on both stages to avoid chipping the sides as much. Beveling with the masonry bit helps reduce the chance of that. When you do speed up, make sure you are not overheating the plastic and potentially burning it. Also keep in mind that you want the hole to not extend into the metal or magnet core of the tile if there is one, so make sure to sink the hole in stages and check the gem in it until it fits, no more no less.
To mark the center of the tile you can use any one of a billion methods, I like to group it with surrounding tiles and draw lines through the diagonals making sure to eyeball that it looks correct after
Once you find the center, I found it helps to start by hand with a sharp bit and make a tiny guide hole for the drillbit to follow so it isn’t skittering around as much ontop of the tile
Marking Tiles with Stickers
For a fairly easy approach to customizing tiles, you can mark them with stickers. You should use ultra-thin stickers that have no sharp edges. The goal is to ensure that the stickers don’t come off/make a sound/scratch the mat when shuffling.
For example, before I and Miles properly customized the tiles, I put some star stickers on my tiles to mark them for Chroma-jong. The stickers turn out to have all the undesirable properties I mentioned abvoe – they are thick, scratch the mat, make a noise, and can come off from getting caught on the mat. To solve this, I carefully put transparent tape over the tile face in a way so they minimize those undesirable properties. I had to use paper cutters to cut the tape along the tiles’ edges so they fit the tile face “perfectly”, i.e., with a bit excess so the tape edges end up on the rounded edges of the tiles (this way, the tape edges don’t contact the mat when shuffling while also ensuring the chroma tiles are indistinguishable from regular tiles).

Professional Tile Customization Service
There are a few companies in Japan that offer tile customization services. I will highlight two currently operational, trustworthy comapnies.
In general, you want to avoid buying single customized tiles – you should ask to customize tiles as part of a new set purchase, or send your old sets in for customization. The reason is to avoid getting new tiles that people can tell apart from existing tiles.
Sasaki
Official page on tile customization: https://www.sasaki-mj.co.jp/user_data/kakou.
This is the company I ordered my customized tiles from (for my Amos REXX III table). I am pretty satisfied with the results:
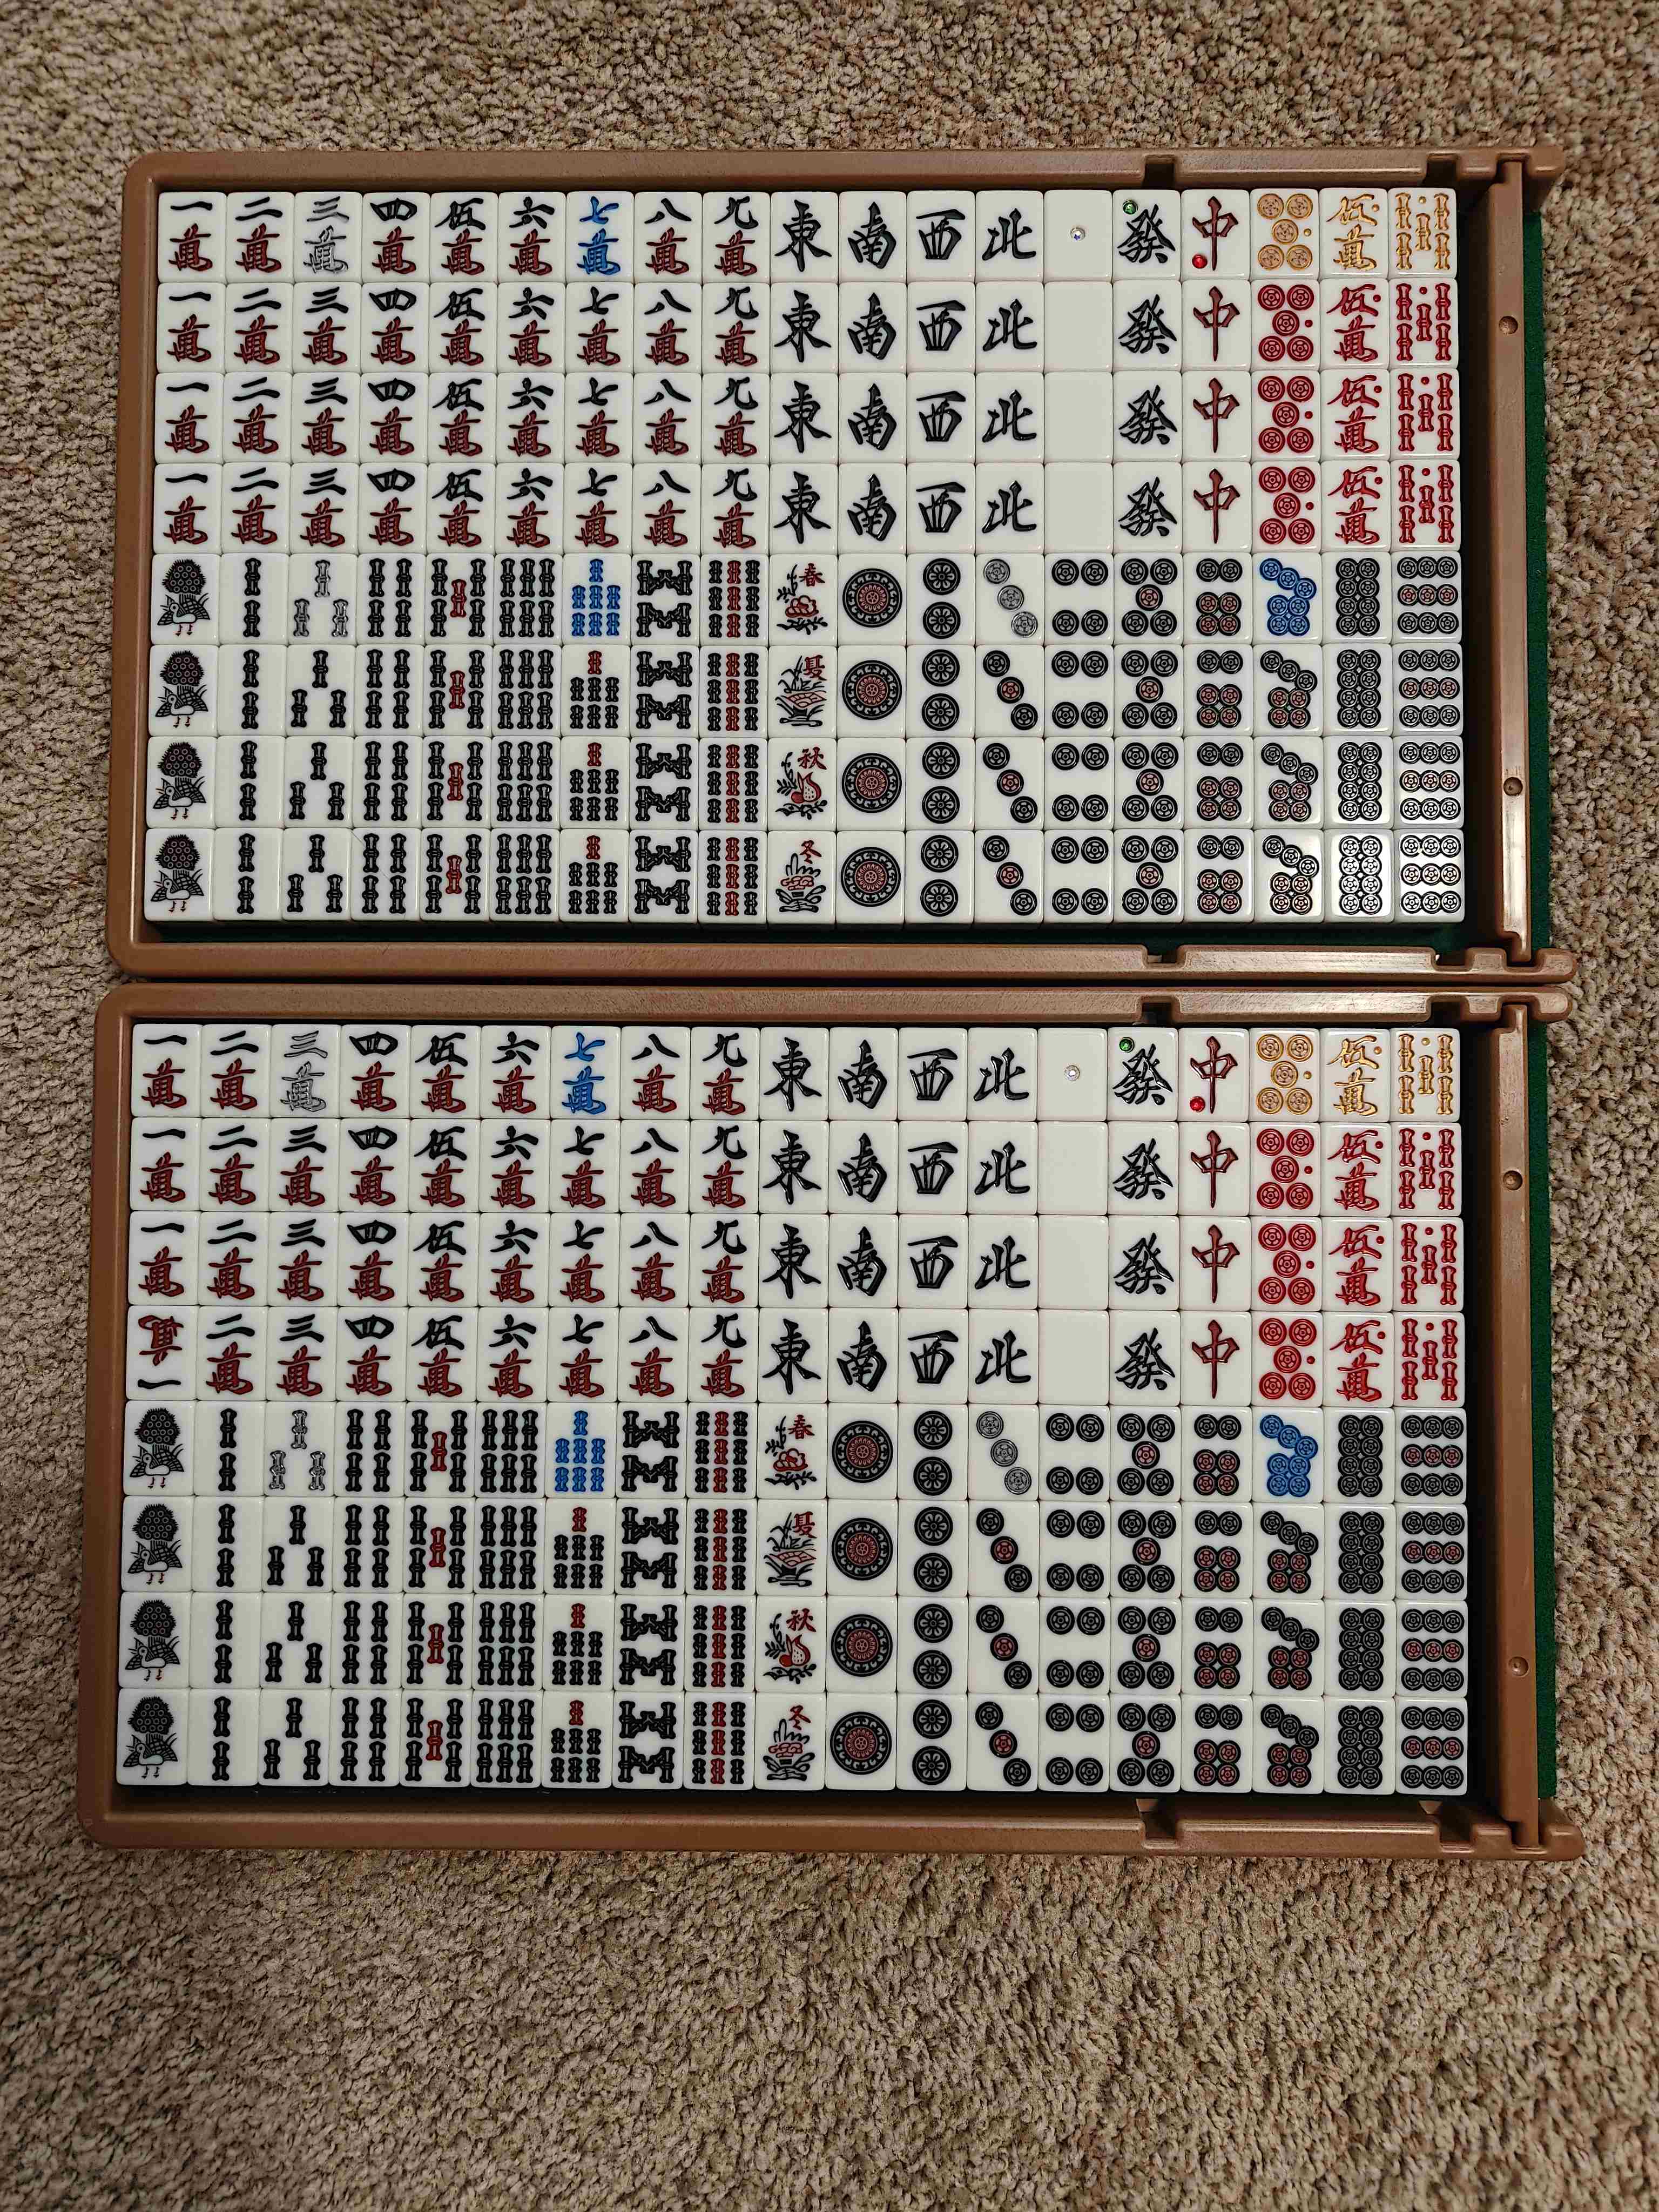
They charged 550 JPY per simple re-color and 1,100 JPY per 5mm diamond pocchi tile. Chroma-jong needed 9 re-colors and 3 pocchi tiles per set, for a total of 24 customized tiles across 2 auto-table sets – the customization invoice was 16,500 JPY. The 2 auto-table sets happen to also cost 16,500 JPY each, so I paid 49,500 JPY for the whole venture (delivery was free, to my Tenso.com address).
Our transaction took place over Line (with their official account), in Japanese.
Alban
Official site: https://www.alban.co.jp/
Having imported 2 automatic tables from Alban and having referred a few people for their own auto-table purchases, I’d confidently share Alban as a trustworthy company. Below is a Slim Voice Score 28 tile set Alban customized for CY.

Unlike Sasaki:
- Alban has official English support, so it’s okay if you speak English but not Japanese.
- Alban does not have an official page for tile customization, so the quotes, etc. happened over email.
- Alban charges a fee for delivering to Tenso.com (1,100 JPY if just buying the tiles)
For REXX III sets, Alban would charge 1,100 JPY for both simple re-colors and diamond pocchi tiles. A full REXX III set costs 16,500 JPY.
For Slim Voice Score 28 sets, Alban also charged 1,100 JPY for simple re-colors and diamond pocchi tiles. A full Slim Voice Score 28 set costs 14,300 JPY.
References
Here is a list of online guides I’ve referenced for this adventure. Except Erik’s guide, all articles are in Japanese. Give them a read if you are interested.
- A Guide to the Recoloring of Mahjong Tiles by Erik K.
- 牌の色を塗り変える手順を公開!オリジナル麻雀牌を作ってみた (note: the author works/worked at Sasaki!)
- 【川越店】牌の塗り替え 終了!
- 自分だけのオリジナル麻雀牌をDIYで自作する方法
- 麻雀牌クリーニング・色入れ(改色)
- 麻雀牌の再塗装 その1 道具を揃えよう
- 麻雀牌(竹牌)のお色直し その1 道具